How to Use Your Mobile Pass

Here's everything you need to know about using your Mobile Pass, from getting ready for travel to boarding the train and the ticket inspections.

How to Setup Your Mobile Pass

Check out the video explaining how to get started with your Mobile Pass. Do you prefer to read the instructions at your own pace? Below the video, you'll also find all information written down.

Download the Rail Planner App

Before you start, ensure you have the latest version of the Rail Planner app. Don't forget that you'll need an internet connection to use some of the app's features while traveling with your Mobile Pass.

Apple App Store Google Play
Loading Your Pass Onto Your Device

Get your Pass ready for travel in 3 easy steps. You can do them all at once, or start now and finish later.

What do the different codes mean?

Mobile Pass Number / Pass Number

The number that you will use to activate your Interrail pass. A six-digit code with both numbers and letters (e.g. XT502R).

Pass Cover Number / Verification Number

A number starting with a big “i” letter followed by 8 numbers. This is for when reserving a seat directly with the train operators (e.g. I12345678).

Passport / ID number

This is the number on your passport or national ID card that you will enter. You can use either one of them on the Interrail app. Please note that you must look up in which countries you can travel with a national ID card.

Pin Code

The app might ask for your pin code to verify that it is you. This is the authentication method that you use to unlock your phone.

Step 1: Add Your Pass

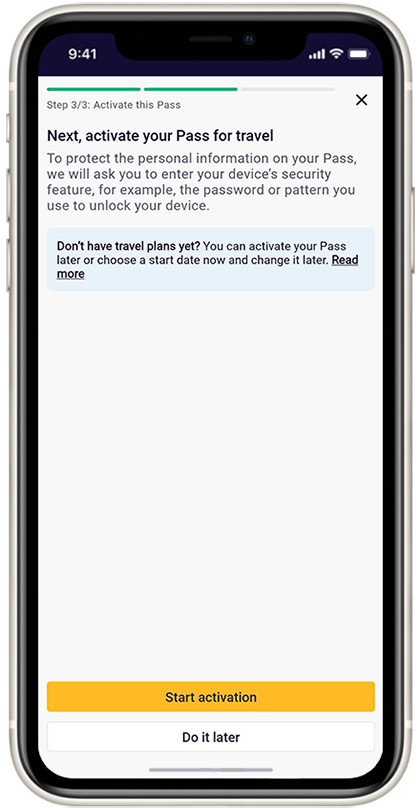
Got the Rail Planner app? Activate your Pass to the app and start getting ready for your trip. Simply follow the link in the confirmation email we sent you when you bought your Pass to get started quickly by following these steps:

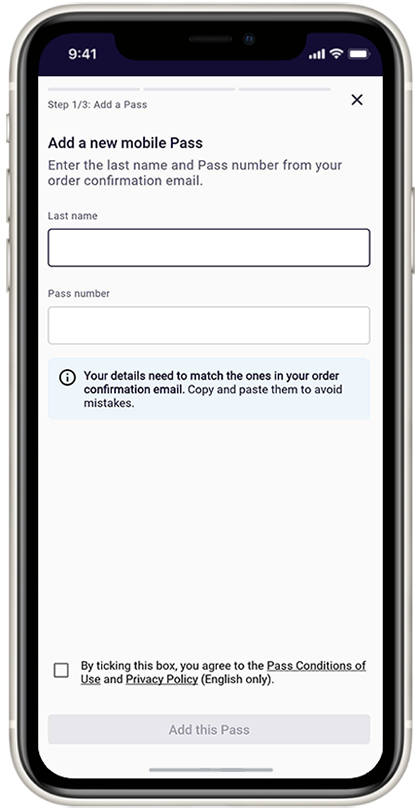
  • Open the Rail Planner app and go to 'My Pass'. Tap 'Add your Pass' to get started.
  • Enter your surname and Pass number. You'll find your Pass number in your confirmation email.

Please note that you will need to precisely enter your surname and Pass number as stated in the confirmation email. These fields are case-sensitive. Please make sure you don't add extra spaces if you copy/paste from the email.

Once your Pass is on your device, you can find it any time in 'My Pass.'

Traveling as a Group?

You can add as many Passes to your device as you like. Remember that you can't move your Pass onto another device once it's been activated for travel. If you're traveling as a group with multiple Passes on one device, it means you'll all need to travel together on all journeys.

Traveling With Children?

Each Child Pass should be added to the same device as at least one Adult Pass, as Child Passes aren't valid without an Adult Pass. Children under 4 can travel with you for free without their own Pass.

Step 2: Connect a Trip

Next, connect a trip to your Pass. This is how you'll keep track of the journeys you take.

  • Create a new trip and give it a name.
  • Or choose a trip that you've already created. You'll see a list of your existing trips that you can choose from.
More Than One Pass on Your Device?

Each Pass needs its own trip, so if you've got a few Passes on your device, you'll need a separate trip for each Pass.

If you've already created a trip, you can duplicate an existing trip to connect a copy of that trip to another Pass.

It's easy to add journeys from the Planner to multiple trips at once, and you can name each trip something different to keep track of all your journeys.

Step 3: Activate Your Pass

Before you start your trip, you need to activate your Pass, so it's ready for travel. You'll need your Passport or the National-ID that you're traveling with, and you'll need to know which date you're taking your first train.

  • Enter your Passport or National-ID number. This should match the document you're traveling with, as you may have to show it to ticket inspectors.
  • Choose your first travel day. This is the first day you'll be using your Pass to travel. Your Pass will be valid from this day until it expires.
Not Sure When You're Starting Your trip?

Don't worry, you can come back to this step later. You can activate your Pass up until the day you start traveling.

Remember that you can't board your first train unless your Pass has been activated, and you need to be online to activate your Pass.

Traveling later? No rush – you can activate your Pass up to 11 months after your purchase date.

Getting Ready to Board the Train
Add journeys to your Pass so you can board the train and show your ticket.
Plan Your Perfect Journey

Search for departure and arrival information in the app using the Planner or station boards.

Tap on a journey to see the full details. You can filter your search using the options button to get the best results.

Save Your Journey to My Trip

Once you've found a journey that suits you, tap to save the journey to your trip.

You can save a journey to as many trips as possible, so it's easy if you're traveling as a group.

Add Your Journey to Your Pass

Ready to travel? Go to your trip and tap to add your Journey to your Pass.

Flexi Passes only: If the date of your journey is not a travel day yet, you'll need to use one of your travel days. You can read more below.

Show Your Ticket

This is the part of your Pass that ticket inspectors need to see. Every travel day in your Pass has a different ticket, and each ticket shows all the journeys you add to your Pass for that travel day.

You can show your ticket in just 2 taps:

  • Go to 'My Pass'
  • Tap 'Show ticket'

The ticket inspector will scan the barcode and check that the train you are on is listed on your ticket. They will also check your personal information and may ask to see your Passport or National ID.

More Than One Pass on Your Device?

You'll need to show a ticket for everyone traveling with a Pass. Just choose another Pass from the list in 'My Pass', then tap 'Show ticket.'

Disable Mobile Pass

If you have activated your travel days in the app, but the travel day has not yet passed, and you want to cancel or change the start date, you must deactivate the Pass.

You do this by going to the app under 'My Pass' and selecting the current Pass.

Then comes a compilation of the Pass, and there you should press on the three dots on the top right side corner of the screen, then select "Deactivate Pass", which shows a pop-up window where you select "Confirm".

Any Questions?